Ship Browser Automation to Users with Steel and Convex
/
/
San Francisco
San Francisco
/
/

Niksa Kuzmanic
Niksa Kuzmanic

Browser automation is easy to demo. Getting it to work reliably for actual users is a different problem.
Controlling Chrome is the simple part. What kills you is the state. A server restarts and the session is gone. Nobody knows which browsers belong to which user. Something throws and a session leaks. Your app has no idea what happened because results live in server logs, not in your database.
That's infrastructure, not Puppeteer. If you're building on Convex, you don't have to build it from scratch. Steel handles the browser runtime. Convex handles the state.
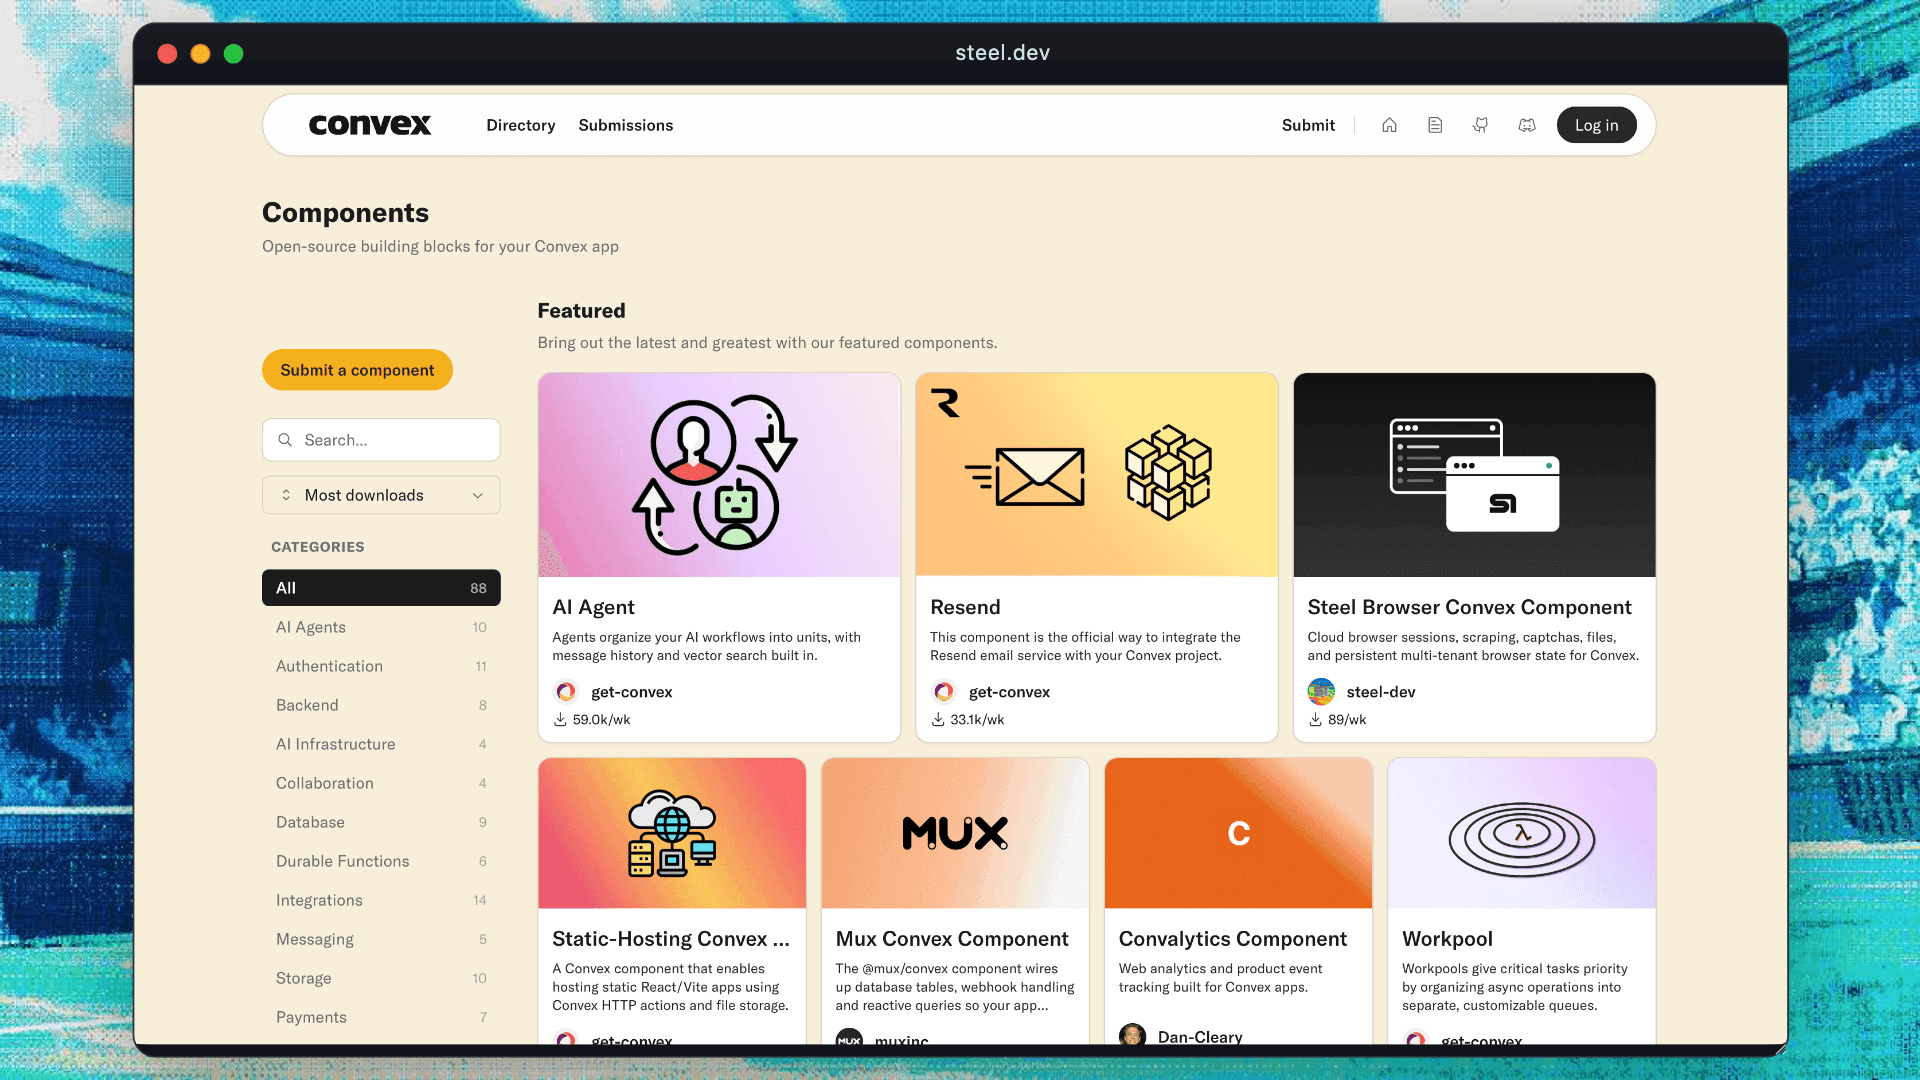
TL;DR: We’re excited to announce the Steel component is now live on the Convex marketplace. Run browser automation without dealing with sessions, state, or leaks. Check it out: https://www.convex.dev/components/steel-dev
What Steel and Convex each do
Steel is the browser runtime. You request a session, connect Playwright or Puppeteer to the WebSocket URL it gives you, and Steel runs the actual browser. Sessions, scraping, screenshots, PDFs, captcha solving, file handling — it does all of that.
Each session also gets a debug URL where you can watch it live, which turns out to be the most useful part when something breaks.
Convex is the state layer. It's a reactive backend: writes are immediately queryable, clients subscribe to changes without polling. Convex has components, which are reusable backend modules with their own tables that you mount with one line of config. They're sandboxed and can't touch your data unless you wire them in.
@steel-dev/convex is one of those components. It wraps the Steel API, writes results into Convex tables, and scopes everything by ownerId. You end up calling browser automation from Convex actions like any other backend operation.
Setting it up with your agent
Paste this into your coding agent (Claude Code, Codex, OpenCode, Pi, etc.) and let it handle the setup.
Help me install the Steel Browser Convex Component component. Package: @steel-dev/convex Install: npm install @steel-dev/convex Documentation: - https://www.convex.dev/components/steel-dev/steel-dev.md - https://www.convex.dev/components/steel-dev/llms.txt Please: 1. Retrieve the install command and documentation 2. Generate an exact setup checklist for this component 3. List any required environment variables 4. Provide verification steps
Setting it up yourself
Prefer to wire it yourself? Follow the steps below.
npmnpmMount it:
import { defineApp } from "convex/server"; import steel from "@steel-dev/convex/convex.config"; const app = defineApp(); app.use(steel); export default app;
Set your Steel API key (Convex functions don't inherit shell env vars):
npx convex env setnpx convex env setThree steps. You don't need a browser fleet, an orchestration service, or your own session ownership scheme.
How it works
Steel operations go through Convex actions. Each action calls the Steel API, then writes the result into Convex tables. Queries read only from Convex, so the database is always the source of truth.
const steel = new SteelComponent(components.steel, { STEEL_API_KEY: process.env.STEEL_API_KEY, }); // Calls the Steel API and writes the session record to Convex const session = await steel.sessions.create(ctx, { sessionArgs: {} }, { ownerId }); // Reads from Convex only, no Steel API call const sessions = await steel.sessions.list(ctx, {}, { ownerId });
Your state doesn't live in any single server process anymore. If a process dies, the data is still in Convex and your app still works.
Multi-tenancy
Every method takes an ownerId. The component enforces it everywhere, so you don't have to invent naming hacks.
await steel.sessions.create(ctx, {}, { ownerId: "user-alice" }); await steel.sessions.create(ctx, {}, { ownerId: "user-bob" }); // Only returns Alice's sessions await steel.sessions.list( ctx, {}, { ownerId: "user-alice" }, );
Pass a user ID or org ID and the component handles scoping. This starts to matter once browser automation is something your users trigger, not just something you run on a cron.
Workflow: agent backends with durable sessions
Say you're building a research agent that logs into tools on behalf of users. Or a procurement agent that checks vendor portals. The common requirement is browser state that's durable and isolated per tenant, with a history your app can query.
export const agentBrowse = action({ args: { ownerId: v.string(), taskUrl: v.string() }, handler: async (ctx, args) => { const { ownerId, taskUrl } = args; const session = await steel.sessions.create( ctx, { sessionArgs: { timeout: 120000 } }, { ownerId }, ); try { const result = await steel.steel.scrape(ctx, { url: taskUrl }, { ownerId }); await ctx.runMutation(api.agentTasks.record, { ownerId, url: taskUrl, content: result?.content ?? "", completedAt: Date.now(), }); return { content: result?.content }; } finally { await steel.sessions.release( ctx, { externalId: session.externalId }, { ownerId }, ); } }, });
The finally block matters. If the task throws and you don't release, the session leaks. We had a tenant hit their session limit because of a missing finally in one action, and it took longer to diagnose than it should have.
Results land in Convex, so your UI can subscribe to task updates without a separate API layer. The same action works for thousands of tenants because ownerId scopes everything.
Workflow: screenshots, PDFs, and scrape pipelines
Not every job needs a long-lived session. Sometimes you just need a PDF of a page, a screenshot for a moderation queue, or structured data scraped into your app.
steel.steel.scrape and steel.steel.screenshot handle the full session lifecycle when it's a one-off task.
export const captureSnapshot = action({ args: { ownerId: v.string(), url: v.string() }, handler: async (ctx, args) => { const screenshot = await steel.steel.screenshot( ctx, { url: args.url }, { ownerId: args.ownerId }, ); await ctx.runMutation(api.snapshots.save, { ownerId: args.ownerId, url: args.url, imageUrl: screenshot?.url ?? "", capturedAt: Date.now(), }); return { imageUrl: screenshot?.url }; }, });
Results are in Convex, which means your UI can display them reactively. A customer triggers a snapshot, and the result appears in their dashboard without polling.
Workflow: persisted browser identity across runs
There's a big gap between running a browser once and having a system that remembers. The component has modules for profiles, credentials, extensions, and session files that bridge it.
An authenticated scraping job doesn't need to log in every time because the profile is saved. Extensions stay loaded between runs. Files carry over. Workflows pick up where they left off instead of starting cold.
What's in the component
Module | What it does |
|---|---|
| create, refresh, release, list, get |
| upload and download files per session |
| solve captchas in-session |
| save and reuse browser state |
| store and reuse login credentials |
| manage browser extensions |
| one-off scrapes, screenshots, PDFs |
Every module follows the same pattern: actions call the Steel API and write results to Convex, queries read from Convex only. Everything is scoped by ownerId.
Observability
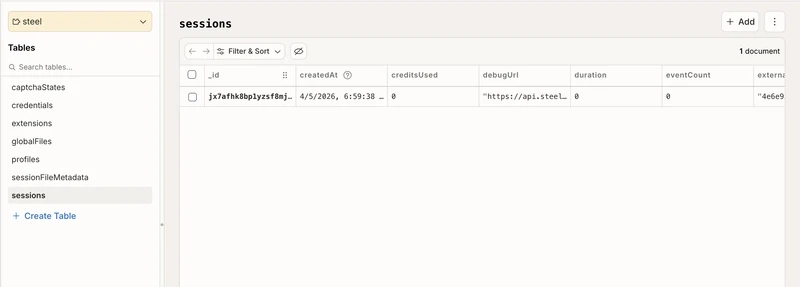
Session metadata lives in Convex, so you query history in the Convex dashboard. Filter by status to find live sessions, or by ownerId to look at one tenant. It's just a database table.
Steel's debugUrl is the other half. Open it while a session runs and you can watch the browser click around. When something goes wrong, you see it happen instead of reconstructing from logs.
Your app's UI can show the same data because it's all in Convex. No separate monitoring setup.
When to use this
This makes sense when browser automation is part of your product, not just a script you run. Users expect isolated sessions and queryable history, and the component handles that so you don't have to build it.
Start building
npm install @steel-dev/convex npx convex dev npx convex env set STEEL_API_KEY <your_key> npx convex run steelSmoke:run '{"ownerId":"tenant-1"}'
GitHub: source code
Demo: see it in action
Browser automation is easy to demo. Getting it to work reliably for actual users is a different problem.
Controlling Chrome is the simple part. What kills you is the state. A server restarts and the session is gone. Nobody knows which browsers belong to which user. Something throws and a session leaks. Your app has no idea what happened because results live in server logs, not in your database.
That's infrastructure, not Puppeteer. If you're building on Convex, you don't have to build it from scratch. Steel handles the browser runtime. Convex handles the state.
TL;DR: We’re excited to announce the Steel component is now live on the Convex marketplace. Run browser automation without dealing with sessions, state, or leaks. Check it out: https://www.convex.dev/components/steel-dev
What Steel and Convex each do
Steel is the browser runtime. You request a session, connect Playwright or Puppeteer to the WebSocket URL it gives you, and Steel runs the actual browser. Sessions, scraping, screenshots, PDFs, captcha solving, file handling — it does all of that.
Each session also gets a debug URL where you can watch it live, which turns out to be the most useful part when something breaks.
Convex is the state layer. It's a reactive backend: writes are immediately queryable, clients subscribe to changes without polling. Convex has components, which are reusable backend modules with their own tables that you mount with one line of config. They're sandboxed and can't touch your data unless you wire them in.
@steel-dev/convex is one of those components. It wraps the Steel API, writes results into Convex tables, and scopes everything by ownerId. You end up calling browser automation from Convex actions like any other backend operation.

Setting it up with your agent
Paste this into your coding agent (Claude Code, Codex, OpenCode, Pi, etc.) and let it handle the setup.
Help me install the Steel Browser Convex Component component. Package: @steel-dev/convex Install: npm install @steel-dev/convex Documentation: - https://www.convex.dev/components/steel-dev/steel-dev.md - https://www.convex.dev/components/steel-dev/llms.txt Please: 1. Retrieve the install command and documentation 2. Generate an exact setup checklist for this component 3. List any required environment variables 4. Provide verification steps
Setting it up yourself
Prefer to wire it yourself? Follow the steps below.
npmMount it:
import { defineApp } from "convex/server"; import steel from "@steel-dev/convex/convex.config"; const app = defineApp(); app.use(steel); export default app;
Set your Steel API key (Convex functions don't inherit shell env vars):
npx convex env setThree steps. You don't need a browser fleet, an orchestration service, or your own session ownership scheme.
How it works
Steel operations go through Convex actions. Each action calls the Steel API, then writes the result into Convex tables. Queries read only from Convex, so the database is always the source of truth.
const steel = new SteelComponent(components.steel, { STEEL_API_KEY: process.env.STEEL_API_KEY, }); // Calls the Steel API and writes the session record to Convex const session = await steel.sessions.create(ctx, { sessionArgs: {} }, { ownerId }); // Reads from Convex only, no Steel API call const sessions = await steel.sessions.list(ctx, {}, { ownerId });
Your state doesn't live in any single server process anymore. If a process dies, the data is still in Convex and your app still works.
Multi-tenancy
Every method takes an ownerId. The component enforces it everywhere, so you don't have to invent naming hacks.
await steel.sessions.create(ctx, {}, { ownerId: "user-alice" }); await steel.sessions.create(ctx, {}, { ownerId: "user-bob" }); // Only returns Alice's sessions await steel.sessions.list( ctx, {}, { ownerId: "user-alice" }, );
Pass a user ID or org ID and the component handles scoping. This starts to matter once browser automation is something your users trigger, not just something you run on a cron.
Workflow: agent backends with durable sessions
Say you're building a research agent that logs into tools on behalf of users. Or a procurement agent that checks vendor portals. The common requirement is browser state that's durable and isolated per tenant, with a history your app can query.
export const agentBrowse = action({ args: { ownerId: v.string(), taskUrl: v.string() }, handler: async (ctx, args) => { const { ownerId, taskUrl } = args; const session = await steel.sessions.create( ctx, { sessionArgs: { timeout: 120000 } }, { ownerId }, ); try { const result = await steel.steel.scrape(ctx, { url: taskUrl }, { ownerId }); await ctx.runMutation(api.agentTasks.record, { ownerId, url: taskUrl, content: result?.content ?? "", completedAt: Date.now(), }); return { content: result?.content }; } finally { await steel.sessions.release( ctx, { externalId: session.externalId }, { ownerId }, ); } }, });
The finally block matters. If the task throws and you don't release, the session leaks. We had a tenant hit their session limit because of a missing finally in one action, and it took longer to diagnose than it should have.
Results land in Convex, so your UI can subscribe to task updates without a separate API layer. The same action works for thousands of tenants because ownerId scopes everything.
Workflow: screenshots, PDFs, and scrape pipelines
Not every job needs a long-lived session. Sometimes you just need a PDF of a page, a screenshot for a moderation queue, or structured data scraped into your app.
steel.steel.scrape and steel.steel.screenshot handle the full session lifecycle when it's a one-off task.
export const captureSnapshot = action({ args: { ownerId: v.string(), url: v.string() }, handler: async (ctx, args) => { const screenshot = await steel.steel.screenshot( ctx, { url: args.url }, { ownerId: args.ownerId }, ); await ctx.runMutation(api.snapshots.save, { ownerId: args.ownerId, url: args.url, imageUrl: screenshot?.url ?? "", capturedAt: Date.now(), }); return { imageUrl: screenshot?.url }; }, });
Results are in Convex, which means your UI can display them reactively. A customer triggers a snapshot, and the result appears in their dashboard without polling.
Workflow: persisted browser identity across runs
There's a big gap between running a browser once and having a system that remembers. The component has modules for profiles, credentials, extensions, and session files that bridge it.
An authenticated scraping job doesn't need to log in every time because the profile is saved. Extensions stay loaded between runs. Files carry over. Workflows pick up where they left off instead of starting cold.
What's in the component
Module | What it does |
|---|---|
| create, refresh, release, list, get |
| upload and download files per session |
| solve captchas in-session |
| save and reuse browser state |
| store and reuse login credentials |
| manage browser extensions |
| one-off scrapes, screenshots, PDFs |
Every module follows the same pattern: actions call the Steel API and write results to Convex, queries read from Convex only. Everything is scoped by ownerId.
Observability
Session metadata lives in Convex, so you query history in the Convex dashboard. Filter by status to find live sessions, or by ownerId to look at one tenant. It's just a database table.
Steel's debugUrl is the other half. Open it while a session runs and you can watch the browser click around. When something goes wrong, you see it happen instead of reconstructing from logs.
Your app's UI can show the same data because it's all in Convex. No separate monitoring setup.

When to use this
This makes sense when browser automation is part of your product, not just a script you run. Users expect isolated sessions and queryable history, and the component handles that so you don't have to build it.
Start building
npm install @steel-dev/convex npx convex dev npx convex env set STEEL_API_KEY <your_key> npx convex run steelSmoke:run '{"ownerId":"tenant-1"}'
GitHub: source code
Demo: see it in action
Browser automation is easy to demo. Getting it to work reliably for actual users is a different problem.
Controlling Chrome is the simple part. What kills you is the state. A server restarts and the session is gone. Nobody knows which browsers belong to which user. Something throws and a session leaks. Your app has no idea what happened because results live in server logs, not in your database.
That's infrastructure, not Puppeteer. If you're building on Convex, you don't have to build it from scratch. Steel handles the browser runtime. Convex handles the state.
TL;DR: We’re excited to announce the Steel component is now live on the Convex marketplace. Run browser automation without dealing with sessions, state, or leaks. Check it out: https://www.convex.dev/components/steel-dev
What Steel and Convex each do
Steel is the browser runtime. You request a session, connect Playwright or Puppeteer to the WebSocket URL it gives you, and Steel runs the actual browser. Sessions, scraping, screenshots, PDFs, captcha solving, file handling — it does all of that.
Each session also gets a debug URL where you can watch it live, which turns out to be the most useful part when something breaks.
Convex is the state layer. It's a reactive backend: writes are immediately queryable, clients subscribe to changes without polling. Convex has components, which are reusable backend modules with their own tables that you mount with one line of config. They're sandboxed and can't touch your data unless you wire them in.
@steel-dev/convex is one of those components. It wraps the Steel API, writes results into Convex tables, and scopes everything by ownerId. You end up calling browser automation from Convex actions like any other backend operation.

Setting it up with your agent
Paste this into your coding agent (Claude Code, Codex, OpenCode, Pi, etc.) and let it handle the setup.
Help me install the Steel Browser Convex Component component. Package: @steel-dev/convex Install: npm install @steel-dev/convex Documentation: - https://www.convex.dev/components/steel-dev/steel-dev.md - https://www.convex.dev/components/steel-dev/llms.txt Please: 1. Retrieve the install command and documentation 2. Generate an exact setup checklist for this component 3. List any required environment variables 4. Provide verification steps
Setting it up yourself
Prefer to wire it yourself? Follow the steps below.
npmMount it:
import { defineApp } from "convex/server"; import steel from "@steel-dev/convex/convex.config"; const app = defineApp(); app.use(steel); export default app;
Set your Steel API key (Convex functions don't inherit shell env vars):
npx convex env setThree steps. You don't need a browser fleet, an orchestration service, or your own session ownership scheme.
How it works
Steel operations go through Convex actions. Each action calls the Steel API, then writes the result into Convex tables. Queries read only from Convex, so the database is always the source of truth.
const steel = new SteelComponent(components.steel, { STEEL_API_KEY: process.env.STEEL_API_KEY, }); // Calls the Steel API and writes the session record to Convex const session = await steel.sessions.create(ctx, { sessionArgs: {} }, { ownerId }); // Reads from Convex only, no Steel API call const sessions = await steel.sessions.list(ctx, {}, { ownerId });
Your state doesn't live in any single server process anymore. If a process dies, the data is still in Convex and your app still works.
Multi-tenancy
Every method takes an ownerId. The component enforces it everywhere, so you don't have to invent naming hacks.
await steel.sessions.create(ctx, {}, { ownerId: "user-alice" }); await steel.sessions.create(ctx, {}, { ownerId: "user-bob" }); // Only returns Alice's sessions await steel.sessions.list( ctx, {}, { ownerId: "user-alice" }, );
Pass a user ID or org ID and the component handles scoping. This starts to matter once browser automation is something your users trigger, not just something you run on a cron.
Workflow: agent backends with durable sessions
Say you're building a research agent that logs into tools on behalf of users. Or a procurement agent that checks vendor portals. The common requirement is browser state that's durable and isolated per tenant, with a history your app can query.
export const agentBrowse = action({ args: { ownerId: v.string(), taskUrl: v.string() }, handler: async (ctx, args) => { const { ownerId, taskUrl } = args; const session = await steel.sessions.create( ctx, { sessionArgs: { timeout: 120000 } }, { ownerId }, ); try { const result = await steel.steel.scrape(ctx, { url: taskUrl }, { ownerId }); await ctx.runMutation(api.agentTasks.record, { ownerId, url: taskUrl, content: result?.content ?? "", completedAt: Date.now(), }); return { content: result?.content }; } finally { await steel.sessions.release( ctx, { externalId: session.externalId }, { ownerId }, ); } }, });
The finally block matters. If the task throws and you don't release, the session leaks. We had a tenant hit their session limit because of a missing finally in one action, and it took longer to diagnose than it should have.
Results land in Convex, so your UI can subscribe to task updates without a separate API layer. The same action works for thousands of tenants because ownerId scopes everything.
Workflow: screenshots, PDFs, and scrape pipelines
Not every job needs a long-lived session. Sometimes you just need a PDF of a page, a screenshot for a moderation queue, or structured data scraped into your app.
steel.steel.scrape and steel.steel.screenshot handle the full session lifecycle when it's a one-off task.
export const captureSnapshot = action({ args: { ownerId: v.string(), url: v.string() }, handler: async (ctx, args) => { const screenshot = await steel.steel.screenshot( ctx, { url: args.url }, { ownerId: args.ownerId }, ); await ctx.runMutation(api.snapshots.save, { ownerId: args.ownerId, url: args.url, imageUrl: screenshot?.url ?? "", capturedAt: Date.now(), }); return { imageUrl: screenshot?.url }; }, });
Results are in Convex, which means your UI can display them reactively. A customer triggers a snapshot, and the result appears in their dashboard without polling.
Workflow: persisted browser identity across runs
There's a big gap between running a browser once and having a system that remembers. The component has modules for profiles, credentials, extensions, and session files that bridge it.
An authenticated scraping job doesn't need to log in every time because the profile is saved. Extensions stay loaded between runs. Files carry over. Workflows pick up where they left off instead of starting cold.
What's in the component
Module | What it does |
|---|---|
| create, refresh, release, list, get |
| upload and download files per session |
| solve captchas in-session |
| save and reuse browser state |
| store and reuse login credentials |
| manage browser extensions |
| one-off scrapes, screenshots, PDFs |
Every module follows the same pattern: actions call the Steel API and write results to Convex, queries read from Convex only. Everything is scoped by ownerId.
Observability
Session metadata lives in Convex, so you query history in the Convex dashboard. Filter by status to find live sessions, or by ownerId to look at one tenant. It's just a database table.
Steel's debugUrl is the other half. Open it while a session runs and you can watch the browser click around. When something goes wrong, you see it happen instead of reconstructing from logs.
Your app's UI can show the same data because it's all in Convex. No separate monitoring setup.

When to use this
This makes sense when browser automation is part of your product, not just a script you run. Users expect isolated sessions and queryable history, and the component handles that so you don't have to build it.
Start building
npm install @steel-dev/convex npx convex dev npx convex env set STEEL_API_KEY <your_key> npx convex run steelSmoke:run '{"ownerId":"tenant-1"}'
GitHub: source code
Demo: see it in action
All Systems Operational

